
Halloween Sugar Cookie Bars That Everyone Will Love!

Introduction to Halloween Sugar Cookie Bars
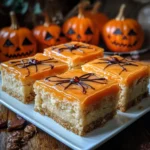
As the leaves turn and the air gets crisp, I find myself dreaming of festive treats that bring joy to my family. These Halloween Sugar Cookie Bars are just the ticket! They’re not only delicious but also incredibly easy to whip up, making them a perfect solution for busy days filled with Halloween activities. Whether you’re hosting a spooky gathering or just want to surprise your loved ones, these bars will surely impress. Plus, the vibrant sprinkles add a fun touch that kids and adults alike will adore. Let’s dive into this delightful recipe!
Why You’ll Love This Halloween Sugar Cookie Bars
These Halloween Sugar Cookie Bars are a dream come true for busy moms and professionals. They come together in just 40 minutes, making them a quick and satisfying treat. The soft, chewy texture paired with festive sprinkles creates a delightful taste that will have everyone coming back for more. Plus, they’re perfect for sharing at parties or enjoying at home, bringing a little extra magic to your Halloween celebrations!
Ingredients for Halloween Sugar Cookie Bars
Gathering the right ingredients is the first step to creating these delightful Halloween Sugar Cookie Bars. Here’s what you’ll need:
- All-purpose flour: This is the backbone of your cookie bars, providing structure and a soft texture.
- Baking powder: A leavening agent that helps the bars rise, giving them that perfect fluffy bite.
- Salt: Just a pinch enhances the sweetness and balances the flavors beautifully.
- Unsalted butter: Softened butter adds richness and moisture, making your bars melt in your mouth.
- Granulated sugar: This sweetener is essential for that classic cookie flavor and a lovely golden color.
- Large eggs: Eggs bind the ingredients together and contribute to the bars’ tender texture.
- Vanilla extract: A splash of vanilla adds warmth and depth to the overall flavor.
- Almond extract: This optional ingredient gives a delightful nutty note that complements the vanilla.
- Halloween-themed sprinkles: These colorful sprinkles not only add a festive touch but also make the bars visually appealing.
Feel free to get creative! You can substitute the sprinkles with chocolate chips or nuts if you prefer. For exact measurements, check the bottom of the article where you can find everything available for printing.
How to Make Halloween Sugar Cookie Bars
Now that you have your ingredients ready, let’s get baking! Follow these simple steps to create your Halloween Sugar Cookie Bars. Trust me, the process is as fun as the end result!
Step 1: Preheat and Prepare
First things first, preheat your oven to 350°F (175°C). This ensures your bars bake evenly. While the oven warms up, grease a 9×13 inch baking pan. You can use butter or cooking spray—whatever you have on hand works just fine!
Step 2: Mix Dry Ingredients
In a medium bowl, whisk together the all-purpose flour, baking powder, and salt. This step is crucial as it helps to evenly distribute the leavening agent. Plus, it makes sure your bars rise beautifully!
Step 3: Cream Butter and Sugar
In a large mixing bowl, cream together the softened butter and granulated sugar. Use an electric mixer if you have one, and beat until the mixture is light and fluffy. This usually takes about 2-3 minutes. The fluffiness is key to achieving that melt-in-your-mouth texture!
Step 4: Add Eggs and Extracts
Next, add the large eggs, vanilla extract, and almond extract to the butter mixture. Mix well until everything is combined. The extracts will infuse your bars with a lovely aroma that will have everyone asking for the recipe!
Step 5: Combine Wet and Dry Ingredients
Gradually add the dry ingredients to the wet mixture. Mix until just combined. Be careful not to overmix; you want your bars to stay soft and chewy. A few flour streaks are okay!
Step 6: Fold in Sprinkles
Now comes the fun part! Gently fold in the Halloween-themed sprinkles. This adds a festive flair and makes your bars look extra special. Just imagine the smiles on your family’s faces when they see those colorful sprinkles!
Step 7: Spread and Bake
Spread the batter evenly in your prepared baking pan. Use a spatula to smooth the top. Bake in the preheated oven for 20-25 minutes. Keep an eye on them! They’re done when a toothpick inserted in the center comes out clean.
Step 8: Cool and Cut
Once baked, remove the pan from the oven and let it cool. This is the hardest part—waiting! Once cool, cut into bars and serve. Enjoy the delightful taste of your Halloween Sugar Cookie Bars!
Tips for Success
- Make sure your butter is softened for easy creaming with sugar.
- Don’t overmix the batter; it can lead to tough bars.
- Use a toothpick to check for doneness; it should come out clean.
- Let the bars cool completely before cutting for cleaner edges.
- Store leftovers in an airtight container to keep them fresh.
Equipment Needed
- 9×13 inch baking pan: A standard size for these bars; you can use a glass or metal pan.
- Mixing bowls: A set of various sizes is handy; you can use any large bowl you have.
- Electric mixer: Great for creaming butter and sugar; a whisk works too if you prefer a workout!
- Spatula: Essential for spreading the batter; a wooden spoon can do the trick as well.
- Measuring cups and spoons: Accurate measurements are key; use any measuring tools you have on hand.
Variations
- Chocolate Chip Halloween Sugar Cookie Bars: Swap out the sprinkles for chocolate chips for a rich, gooey treat that chocolate lovers will adore.
- Gluten-Free Option: Use a gluten-free all-purpose flour blend to make these bars suitable for those with gluten sensitivities.
- Nutty Delight: Add chopped nuts like walnuts or pecans for a crunchy texture that complements the soft bars.
- Frosted Bars: Top your cooled bars with a simple vanilla or cream cheese frosting for an extra layer of sweetness and decoration.
- Spiced Variation: Add a teaspoon of cinnamon or pumpkin spice to the dry ingredients for a warm, autumnal flavor that screams Halloween!
Serving Suggestions
- Pair your Halloween Sugar Cookie Bars with a warm cup of apple cider for a cozy treat.
- Serve with a scoop of vanilla ice cream for a delightful dessert experience.
- For a festive touch, arrange the bars on a spooky-themed platter.
- Consider adding a sprinkle of powdered sugar on top for an elegant finish.
FAQs about Halloween Sugar Cookie Bars
Can I make these Halloween Sugar Cookie Bars ahead of time?
Absolutely! You can prepare the batter a day in advance and store it in the fridge. Just remember to let it come to room temperature before baking. This makes it super convenient for busy days!
How should I store leftover cookie bars?
Store your Halloween Sugar Cookie Bars in an airtight container at room temperature. They’ll stay fresh for up to a week. If you want to keep them longer, you can freeze them for up to three months!
Can I use different types of sprinkles?
Of course! While Halloween-themed sprinkles add a festive touch, feel free to use any sprinkles you have on hand. Chocolate chips or nuts can also be great alternatives for a different flavor profile.
What if I don’t have almond extract?
No worries! You can simply omit the almond extract or replace it with an extra splash of vanilla extract. Your bars will still taste delicious!
Can I double the recipe for a larger crowd?
Yes! Just double the ingredients and use a larger baking pan. Keep an eye on the baking time, as it may vary slightly with a larger batch. Enjoy sharing these delightful treats!
Final Thoughts
Creating these Halloween Sugar Cookie Bars is more than just baking; it’s about making memories with your loved ones. The joy of mixing, baking, and finally sharing these delightful treats brings a warmth to any gathering. Each bite is a reminder of the fun and laughter that Halloween brings. Plus, the vibrant sprinkles add a touch of magic that lights up the room. So, whether you’re hosting a spooky party or enjoying a cozy night in, these bars are sure to be a hit. Embrace the spirit of the season and enjoy every delicious moment!
PrintHalloween Sugar Cookie Bars That Everyone Will Love!
Delicious and festive Halloween sugar cookie bars that are perfect for any Halloween celebration.
- Prep Time: 15 minutes
- Cook Time: 25 minutes
- Total Time: 40 minutes
- Yield: 24 bars 1x
- Category: Dessert
- Method: Baking
- Cuisine: American
- Diet: Vegetarian
Ingredients
- 2 1/2 cups all-purpose flour
- 1 teaspoon baking powder
- 1/2 teaspoon salt
- 1 cup unsalted butter, softened
- 1 1/2 cups granulated sugar
- 2 large eggs
- 1 teaspoon vanilla extract
- 1/2 teaspoon almond extract
- 1 cup Halloween-themed sprinkles
Instructions
- Preheat the oven to 350°F (175°C) and grease a 9×13 inch baking pan.
- In a bowl, whisk together flour, baking powder, and salt.
- In a separate bowl, cream together the butter and sugar until light and fluffy.
- Add the eggs, vanilla extract, and almond extract to the butter mixture and mix well.
- Gradually add the dry ingredients to the wet ingredients and mix until just combined.
- Fold in the Halloween-themed sprinkles.
- Spread the batter evenly in the prepared baking pan.
- Bake for 20-25 minutes or until a toothpick inserted in the center comes out clean.
- Allow to cool before cutting into bars and serving.
Notes
- For a more festive touch, top with Halloween-themed frosting.
- Store in an airtight container for up to a week.
- Feel free to substitute the sprinkles with chocolate chips or nuts if desired.
Nutrition
- Serving Size: 1 bar
- Calories: 150
- Sugar: 10g
- Sodium: 50mg
- Fat: 7g
- Saturated Fat: 4g
- Unsaturated Fat: 2g
- Trans Fat: 0g
- Carbohydrates: 20g
- Fiber: 0g
- Protein: 2g
- Cholesterol: 30mg
Keywords: Halloween, Sugar Cookie Bars, Dessert, Festive Treats