
Halloween Mummy Pretzels

Introduction to Halloween Mummy Pretzels
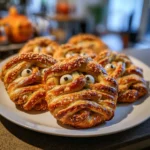
As the leaves turn and the air gets crisp, I find myself dreaming up fun treats for Halloween. One of my absolute favorites is Halloween Mummy Pretzels. These delightful snacks are not only a quick solution for a busy day, but they also bring a smile to everyone’s face. With just a few simple ingredients, you can create a sweet and salty masterpiece that’s perfect for parties or family gatherings. Trust me, these adorable mummies will impress your loved ones and make your Halloween celebrations even more special!
Why You’ll Love This Halloween Mummy Pretzels
Halloween Mummy Pretzels are a delightful blend of sweet and salty that everyone will adore. They’re incredibly easy to make, taking just 25 minutes from start to finish. Perfect for busy moms like us, these treats require minimal effort but deliver maximum fun. Plus, they’re a hit with kids and adults alike, making them a fantastic addition to any Halloween celebration!
Ingredients for Halloween Mummy Pretzels
To whip up these delightful Halloween Mummy Pretzels, you’ll need a few simple ingredients that are easy to find. Here’s what you’ll need:
- Pretzel rods: These provide the perfect crunchy base. Their shape makes them ideal for creating mummy-like figures.
- White chocolate chips: This sweet coating gives the pretzels their mummy appearance. You can also use colored chocolate melts for a fun twist!
- Candy eyes: These little gems add personality to your mummies. They’re available at most craft stores or online.
- Vegetable oil: A tablespoon of this helps the chocolate melt smoothly, ensuring a nice, even coating.
For those looking to mix things up, consider using dark chocolate or even yogurt-covered pretzels for a different flavor profile. You can find all the exact measurements at the bottom of the article, ready for printing!
How to Make Halloween Mummy Pretzels
Step 1: Melt the Chocolate
To start, grab a microwave-safe bowl and toss in your white chocolate chips along with the vegetable oil. This little addition helps the chocolate melt smoothly, creating a luscious coating. Microwave the mixture in 30-second intervals, stirring in between. Keep an eye on it! You want it to be perfectly melted and smooth, not burnt. Once it’s ready, you’ll have a silky chocolate that’s just begging to coat those pretzels.
Step 2: Dip the Pretzels
Now comes the fun part! Take each pretzel rod and dip it into the melted chocolate. Make sure to coat it thoroughly, giving it a nice, even layer. You can use a spoon to help cover any spots that need a little extra love. As you pull the pretzel out, let the excess chocolate drip off. This will prevent any clumps and ensure a beautiful finish. Trust me, the more chocolate, the merrier when it comes to these Halloween Mummy Pretzels!
Step 3: Prepare for Decoration
Once your pretzels are coated, it’s time to set them down. Line a baking sheet with parchment paper to prevent sticking. Carefully place each chocolate-covered pretzel on the sheet, giving them a little space. This will make decorating them much easier later on!
Step 4: Create the Mummy Wrap
Here’s where the magic happens! With the remaining melted chocolate, drizzle it over the coated pretzels to create that iconic mummy wrap effect. You can use a spoon or a piping bag for more control. Just let your creativity flow! The goal is to make it look like your pretzels are wrapped in bandages. Don’t worry about perfection; the more whimsical, the better! This step adds character and charm to your Halloween Mummy Pretzels.
Step 5: Add the Eyes
While the chocolate is still wet, it’s time to give your mummies some personality. Place two candy eyes on each pretzel, pressing them gently into the chocolate. This will help them stick and create that adorable, spooky look. You’ll be amazed at how these little details bring your mummies to life!
Step 6: Cool and Serve
Finally, let your Halloween Mummy Pretzels cool completely. Allow the chocolate to harden, which usually takes about 15-20 minutes. Once they’re set, they’re ready to be served! You can store them in an airtight container if you’re not enjoying them right away. But trust me, they won’t last long!
Tips for Success
- Make sure your chocolate is fully melted for a smooth coating.
- Use a spoon to help coat the pretzels evenly, especially in tricky spots.
- Don’t rush the cooling process; let the chocolate harden completely for the best results.
- Experiment with different toppings like sprinkles for added fun!
- Keep your workspace organized to make the process smoother.
Equipment Needed
- Microwave-safe bowl: Any heatproof bowl will do if you don’t have one.
- Spoon: A regular spoon works great for dipping and drizzling.
- Parchment paper: If you’re out, wax paper can be a good substitute.
- Baking sheet: A flat tray or plate can also work for cooling.
Variations
- Dark Chocolate Mummies: Swap white chocolate for dark chocolate for a richer flavor that pairs beautifully with the salty pretzels.
- Nut-Free Option: Ensure your chocolate is nut-free if you’re serving kids with allergies. Many brands offer safe options!
- Gluten-Free Pretzels: Use gluten-free pretzel rods to make this treat suitable for those with gluten sensitivities.
- Colorful Mummies: Use colored chocolate melts instead of white chocolate for a vibrant twist that’s sure to catch the eye.
- Sprinkle Toppings: Add festive sprinkles or edible glitter on top of the chocolate before it hardens for an extra pop of fun!
Serving Suggestions
- Pair your Halloween Mummy Pretzels with a spooky punch or apple cider for a festive drink.
- Serve them on a decorative platter with Halloween-themed napkins for a fun presentation.
- Include a mix of other Halloween treats, like ghost-shaped cookies, for a delightful dessert table.
- Wrap them in clear bags tied with orange ribbons for cute party favors.
FAQs about Halloween Mummy Pretzels
Can I use different types of chocolate for my Halloween Mummy Pretzels?
Absolutely! While white chocolate gives that classic mummy look, you can experiment with dark chocolate or even colored chocolate melts. Each option adds a unique twist to your treats!
How should I store my Halloween Mummy Pretzels?
To keep your pretzels fresh, store them in an airtight container at room temperature. They’ll stay delicious for several days, but I doubt they’ll last that long!
Can I make these pretzels ahead of time?
Yes! You can prepare your Halloween Mummy Pretzels a day or two in advance. Just make sure they’re stored properly to maintain their crunchiness and flavor.
What can I do if my chocolate isn’t melting smoothly?
If your chocolate isn’t melting well, try adding a little more vegetable oil. This helps create a smoother consistency. Also, be sure to melt it in short intervals to avoid burning!
Are Halloween Mummy Pretzels suitable for kids with allergies?
To accommodate allergies, check the labels on your chocolate and pretzels. You can find nut-free and gluten-free options to ensure everyone can enjoy these spooky treats!
Final Thoughts
Making Halloween Mummy Pretzels is more than just a fun kitchen project; it’s a delightful way to create memories with your loved ones. The joy of dipping pretzels in chocolate and decorating them together can spark laughter and creativity. Plus, these treats are sure to be a hit at any gathering, bringing smiles to faces young and old. Whether you’re hosting a party or simply enjoying a cozy night in, these adorable mummies will add a touch of magic to your Halloween celebrations. So grab your ingredients and let the fun begin!
PrintHalloween Mummy Pretzels: A Fun and Easy Treat!
Halloween Mummy Pretzels are a fun and easy treat perfect for Halloween parties. These sweet and salty snacks are made by dipping pretzels in white chocolate and decorating them to look like mummies.
- Prep Time: 15 minutes
- Cook Time: 10 minutes
- Total Time: 25 minutes
- Yield: 24 pretzels 1x
- Category: Dessert
- Method: No-Bake
- Cuisine: American
- Diet: Vegetarian
Ingredients
- 1 bag of pretzel rods
- 1 cup of white chocolate chips
- 1 cup of candy eyes
- 1 tablespoon of vegetable oil
Instructions
- Melt the white chocolate chips and vegetable oil in a microwave-safe bowl, stirring until smooth.
- Dip each pretzel rod into the melted chocolate, ensuring it is fully coated.
- Place the coated pretzels on a baking sheet lined with parchment paper.
- Before the chocolate sets, drizzle more melted chocolate over the pretzels to create a mummy wrap effect.
- Place two candy eyes on each pretzel while the chocolate is still wet.
- Allow the pretzels to cool and the chocolate to harden before serving.
Notes
- For a fun twist, you can use colored chocolate melts instead of white chocolate.
- Store the pretzels in an airtight container to keep them fresh.
- These make great party favors or classroom treats!
Nutrition
- Serving Size: 1 pretzel
- Calories: 120
- Sugar: 10g
- Sodium: 50mg
- Fat: 6g
- Saturated Fat: 4g
- Unsaturated Fat: 2g
- Trans Fat: 0g
- Carbohydrates: 15g
- Fiber: 0g
- Protein: 1g
- Cholesterol: 0mg
Keywords: Halloween, Mummy Pretzels, Treats, Snacks, Easy Recipes