
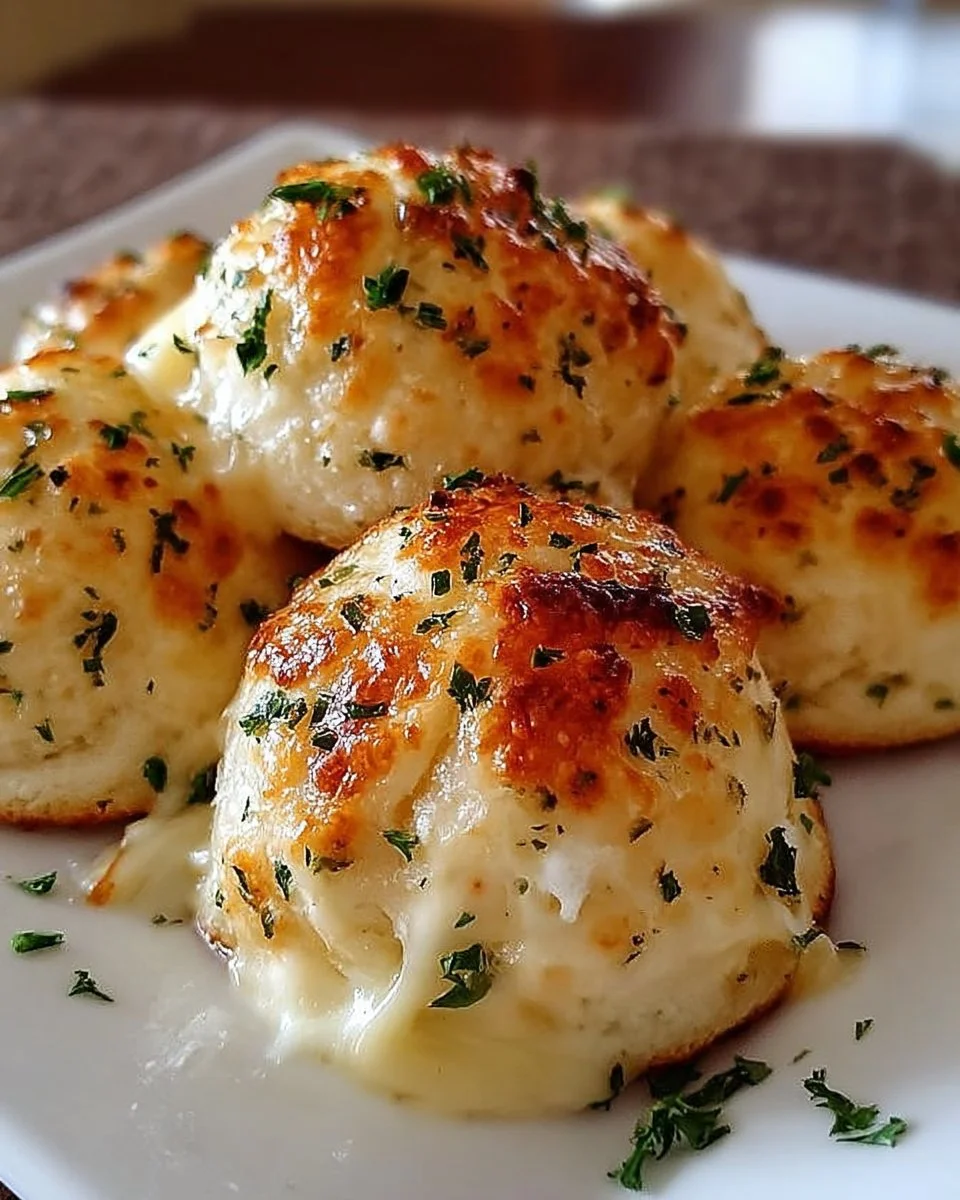
Cheesy Garlic Butter Bombs
Imagine sinking your teeth into a warm, buttery pocket that bursts with the rich, gooey allure of melted cheese. Each bite reveals a delightful crunch on the outside, giving way to a soft, comforting interior—this is the magic of Cheesy Garlic Butter Bombs. As you pull one apart, the aroma of garlic wafts through the air, teasing your senses, enveloping you in a comforting embrace that feels like home. It’s the kind of indulgence that draws you back for just one more, and every subsequent bite ignites a delicious symphony of flavors that dances on your palate, leaving you yearning for more.
Picture yourself gathering around the dinner table with friends or family, laughter ringing through the air as you present this stunning yet simple appetizer. The warm, golden globes glisten under a brush of melted butter, a promise of awe-inspiring flavor that lies within. Made with minimal ingredients—but brimming with personality—these cheesy delights effortlessly steal the spotlight at any gathering, from casual game nights to festive holiday parties. Your guests won’t help but marvel at how something so uncomplicated can be so utterly divine.
Why You’ll Love This Cheesy Garlic Butter Bombs
With each Cheesy Garlic Butter Bomb, you experience the perfect marriage of textures and flavors. The creamy, stretchy cheese mingles with the warm embrace of garlic-infused butter, creating a mouthwatering goodness that feels both indulgent and comforting. Not only do these bites serve as a perfect appetizer, but they also shine as a side dish or afternoon snack, making them surprisingly versatile. Their buttery aroma fills your kitchen, inviting everyone in for a taste—even before they leave the oven!
These delightful morsels have the power to create memorable moments. Infuse your gatherings with warmth and camaraderie as you watch friends and family eagerly reach for seconds. The joy they bring lies not only in their delicious taste but also in the shared experience they foster. Perfect for cozy evenings at home or to impress during special occasions, these Cheesy Garlic Butter Bombs become a staple in your culinary repertoire.
Preparation Phase & Tools to Use
To embark on this delicious journey of baking, a few essential tools will elevate your experience:
- Mixing Bowls: A sturdy mixing bowl for combining your dry ingredients and another for the wet helps streamline your process.
- Baking Sheet: Choose a sturdy baking sheet, ideally lined with parchment paper for easy cleanup and even baking.
- Measuring Cups and Spoons: Precision matters in baking, so accurate measuring tools ensure that your ratios remain spot-on.
- Silicone Spatula: A spatula helps to fold your ingredients gently, ensuring each bite is luxurious and cheesy.
- Oven: Preheat it to the perfect temperature to transform your dough into golden perfection.
Preparation tips:
- Have all your ingredients at room temperature; this ensures even blending and a smoother texture.
- Pre-measure your ingredients; this speeds up the process and maintains focus on perfect execution.
Ingredients for Cheesy Garlic Butter Bombs
- 1 cup all-purpose flour: This forms the base of your dough. If gluten-free is your aim, try a gluten-free flour blend as a substitute.
- 1 teaspoon baking powder: This critical leavening agent gives your bombs that lovely lift, contributing to a light texture.
- 1/2 teaspoon salt: A small yet mighty ingredient that enhances the flavors of your dish.
- 1/4 cup unsalted butter, melted: The foundation of that rich, buttery flavor we all crave. Opt for a higher-quality butter for the best experience.
- 1/2 cup milk: Whole milk offers creaminess. For a lighter option, use almond milk or a non-dairy alternative.
- 1 cup shredded cheese (mozzarella or a blend): Choose your favorite cheese—mozzarella becomes wonderfully gooey, while a blend adds complexity of flavor.
- 2 tablespoons garlic, minced: Fresh garlic brings a sharp, herbaceous flavor; powdered garlic can work in a pinch, but fresh will always shine.
- 1 tablespoon parsley, chopped: Fresh parsley adds a pop of color and brightness to balance the richness.
- Additional melted butter for brushing: A finishing touch that ensures each bomb glistens invitingly.
How to Make Cheesy Garlic Butter Bombs
- Preheat the oven to 375°F (190°C), creating an inviting space for baking.
- In a bowl, mix flour, baking powder, and salt. This step combines your dry ingredients, laying the foundation for fluffy dough.
- In another bowl, combine melted butter and milk. Ensure the butter isn’t too hot to avoid cooking the other ingredients.
- Slowly add the wet ingredients to the dry, mixing until a dough forms. If the mixture is too sticky, don’t hesitate to sprinkle in a little more flour.
- In a separate bowl, mix cheese, garlic, and parsley. This cheesy filling becomes the heart of each garlic bomb, full of flavor.
- Divide the dough into 12 pieces, flatten each piece slightly in your hand, and place a spoonful of the cheese mixture in the center.
- Fold the dough over the filling, pinching it closed and shaping into smooth balls. Ensuring the filling is sealed means gooey goodness with every bite.
- Place on a baking sheet and brush with melted butter. This not only adds flavor but also promotes that irresistible golden browning.
- Bake for 15-20 minutes, or until golden brown. Keep an eye on the oven; you want perfection, not burnt edges.
- Serve warm and watch as hearts and appetites embrace these heavenly balls of cheesy delight.
Chef’s Notes & Helpful Tips
- Make-ahead tips: Prepare the filling in advance and store it in the fridge. On baking day, create the dough and fill it with the prepped cheese and garlic blend.
- Cooking alternatives: For a quicker version, try an air fryer. Cook at 350°F (175°C) for about 10-12 minutes, checking for that perfect golden exterior.
- Customization ideas: Add cooked bacon bits for a smoky flavor, or spice things up with a sprinkle of red pepper flakes for a hint of heat.
Common Mistakes to Avoid
When whipping up these Cheesy Garlic Butter Bombs, a few pitfalls can sneak up on you:
- Not measuring ingredients accurately: Baking is as much about chemistry as it is about cooking. Use precise measurements for the best outcome.
- Overmixing the dough: This can lead to dense bombs. Mix until just combined to keep them light and fluffy.
- Filling too much: Overstuffing can cause an explosion, spilling out gooey contents. Stick to the recommended amount to create a delightful surprise in every bite.
What to Serve With Cheesy Garlic Butter Bombs
These gems complement a wide array of dishes, making them the perfect crowd-pleaser. Consider serving with:
- Marinara sauce for dipping, enhancing the savory profile with its rich acidity.
- A fresh salad, such as caesar or garden, to balance the richness.
- Creamy soups, like tomato basil, provide comfort and seamless pairing.
- Pasta dishes, especially alfredo, offering an indulgent feast for pasta lovers.
- Charcuterie boards for a festive gathering, allowing your bombs to shine amongst an array of flavors.
- Wine pairings, such as a crisp Chardonnay or a fruity red, to elevate your dining experience.
- Stews or roasted vegetables, bringing warmth and heartiness to the table.
- Brewed coffee or tea for a delightful brunch option.
Storage & Reheating Instructions
Unfinished Cheesy Garlic Butter Bombs deserve proper storage. Store them in an airtight container in the fridge for up to three days or freeze them for up to a month. To reheat, simply bake in a preheated oven at 350°F (175°C) for about 10 minutes until warmed through.
Estimated Nutrition Information
Approximately per bomb (based on 12 servings):
- Calories: 150
- Fat: 8g
- Carbohydrates: 18g
- Protein: 4g
(Note: Due to variations in ingredients and serving sizes, these values are approximate.)
FAQs
1. Can I use other types of cheese?
Certainly! Cheddar, gouda, or Monterey jack will work beautifully—experiment with your favorites to create the perfect flavor profile.
2. Can I make these vegan?
Yes! Use a vegan butter substitute and dairy-free cheese and milk. They will turn out just as delicious!
3. How can I adjust the garlic flavor?
If you prefer a milder taste, reduce the garlic to one tablespoon. For garlic lovers, feel free to ramp it up!
4. Can these be frozen before baking?
Absolutely! Freeze the assembled but unbaked bombs on a baking sheet. Once solid, transfer to a freezer bag and bake directly from frozen—just add a few extra minutes to the cooking time.
5. What can I do with leftover bombs?
You can enjoy them with a spread of hummus or salad, or gently reheat them and pair them with a lovely marinara or ranch dip.
Conclusion
Indulging in the sensation of Cheesy Garlic Butter Bombs means embracing warmth, comfort, and delightful flavor. Dive into the tactile joy of preparing these little treasures, enjoying how they transform simple ingredients into something truly special. Let the aromas fill your kitchen, the laughter of friends blend with whispers of satisfaction, and allow each bite to encapsulate a moment worth savoring. Embrace the tradition, share the joy, and most importantly—don’t forget to enjoy every gooey, cheesy morsel! Get ready to fall in love, one buttery bomb at a time.
PrintCheesy Garlic Butter Bombs
Indulge in warm, buttery pockets filled with rich, gooey melted cheese, perfect as an appetizer or snack.
- Prep Time: 15 minutes
- Cook Time: 20 minutes
- Total Time: 35 minutes
- Yield: 12 servings 1x
- Category: Appetizer
- Method: Baking
- Cuisine: American
- Diet: Vegetarian
Ingredients
- 1 cup all-purpose flour
- 1 teaspoon baking powder
- 1/2 teaspoon salt
- 1/4 cup unsalted butter, melted
- 1/2 cup milk
- 1 cup shredded cheese (mozzarella or a blend)
- 2 tablespoons garlic, minced
- 1 tablespoon parsley, chopped
- Additional melted butter for brushing
Instructions
- Preheat the oven to 375°F (190°C).
- In a bowl, mix flour, baking powder, and salt.
- In another bowl, combine melted butter and milk.
- Slowly add the wet ingredients to the dry, mixing until a dough forms.
- In a separate bowl, mix cheese, garlic, and parsley.
- Divide the dough into 12 pieces, flatten each piece, and place a spoonful of the cheese mixture in the center.
- Fold the dough over the filling, pinching it closed.
- Place on a baking sheet and brush with melted butter.
- Bake for 15-20 minutes, or until golden brown.
- Serve warm.
Notes
Make-ahead tips: Prepare the filling in advance. Cooking alternatives: Try an air fryer for quicker results.
Nutrition
- Serving Size: 1 serving
- Calories: 150
- Sugar: 1g
- Sodium: 200mg
- Fat: 8g
- Saturated Fat: 5g
- Unsaturated Fat: 3g
- Trans Fat: 0g
- Carbohydrates: 18g
- Fiber: 1g
- Protein: 4g
- Cholesterol: 15mg
Keywords: Cheesy Garlic, Snacks, Appetizers, Baking